Google
 
Welcome at MyBlog And Thank You have been visiting here!!
Showing posts with label article photoshop. Show all posts

Adventures Of Using Photoshop

1 comments

If you don't have Adobe Photoshop, most other comprehensive graphics suites will do (ie. PaintShop Pro). Sorry folks, MS Paint doesn't cut it...


Note: I'll be using Photoshop CS, but older versions of Photoshop are just fine.

The first thing we need is a canvas on which you'll create your masterpiece. Click File -> New (shortcut: ctrl+n). You can ignore most of the settings save for the width, height and background fields. Enter 400 for width and height and ensure that "transparent" is selected as your background. Click "OK" and you're ready to begin.

Don't Panic: You will see a checkerboard pattern on your canvas. This is Photoshop's way of showing transparency.
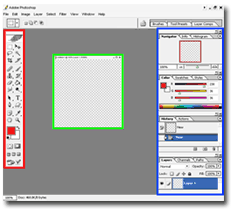


The area highlighted in red is the tool bar. I will go through each tool in detail in subsequent tutorials.

The area in green is your canvas. This is where your graphics will be created.

The area highlighted in blue are the Palette windows. These are the keys to unlocking some of Photoshop's most powerful and innovative features.

I encourage you to play around with the various tools just to get your feet wet. Accidental discovery is a great way to learn the intricacies of Photoshop. See you next month!

Read more.....

Happy with Photoshop in Blend it like Beckham

0 comments

Layer blend modes are a powerful, but often overlooked, feature of Photoshop. This month we're going to use layer blend modes to correct under or over exposures in your digital photograph collection....


We'll begin with overexposures. The first thing you need to do is duplicate the layer that holds your overexposed photograph. To do this, right click on the layer and chose "Duplicate Layer" from the drop down menu.

You should now have two instances of your photograph. Choose the topmost layer and switch the blending mode to 'Multiply' (located at the top of the layers palette). If you like you results, you are done!
If your photo is still a little light, keep duplicating the topmost layer until you are satisfied; however, if the picture is too dark now, lower the opacity of the top layer until you get the desired color saturation. For the image below, I used two duplicates with the second duplicate set to 15% opacity.


Read more.....